
Korky 3040BP Cadet 3 flapper
$12.25 at Amazon
Check it on AmazonPrice as of Nov 22, 2026, 9:30 AM EST
Match the tank and valve before changing the seal.
As an Amazon Associate I earn from qualifying purchases. How this site earns

Updated November 15, 2026
For listed Cadet 3 tanks, use Korky 3040BP. Champion 4 uses a matching seal; older 2-inch valves need a 2-inch flapper. Shut off water before removal.
Cadet is a family name, so it does not settle the size. Record the tank marking and check whether the seal swings from side pegs or sits around a center post.
Check the 3040BP model list below and the installed valve shape. Its maker lists a 3-inch opening.
Use the 100BP model list. A Cadet name alone does not make it a Cadet 3.
Compare the hardware with the seal instructions. A hinged 3-inch flapper is not the same repair.
Stop this flapper procedure. Do not open a pressure-assist vessel or change a dual-flapper linkage using ordinary flapper steps.
Photograph the marking inside the tank before removing the old flapper. American Standard distinguishes the tank identifier from the lid identifier: a lid number beginning with 735 is not the tank model. Keep any letters and suffixes visible in the photograph, too.
Then photograph the valve from above and from the side. Korky asks for both the model and valve shape in its 3040BP and 450BP instructions. If a past repair changed the flush valve, a match to the porcelain tank number alone can lead you to the wrong flapper.
My call: match the installed hardware before treating a model list as permission to buy. A chain, a red rubber part and an American Standard logo do not distinguish a Cadet hinge from a Champion seal carrier.
A fill valve that turns on by itself may be replacing water lost through a flapper. A fill valve that keeps running after the tank is full needs a different check.
Flush, let the tank refill, then mark the water level with a pencil. Korky uses this mark to distinguish real water loss from the sound of a refill. Do not change the fill-valve setting during the test.
Turn off the local shutoff, as Korky’s leak test directs. If the tank continues refilling or the shutoff leaks, stop and call a licensed plumber. Do not force the handle or disconnect a supply line while water is still feeding the tank.
Korky says to wait at least 25 minutes. A level below the pencil mark shows a leak. Leave the water off longer to see where the level settles; the level at the first check does not by itself identify the failed part.
Water that settles at the flapper or seal points toward that seal. Water that falls below it, toward the tank bottom or a defect in the overflow tube, points toward a flush-valve repair. Check the outside of the tank for water as well.
Korky’s longer observation is a couple of hours. A crack, floor leak or shutoff that will not close is a reason to stop immediately; do not wait for the test to finish.
If water keeps flowing into the overflow after a full refill, check the fill valve and float rather than assuming a new flapper will fix it. The American Standard fill-valve guide covers that part of the tank. Keep the flapper test separate from a fill-valve adjustment.
American Standard’s Cadet sequence starts with the water off and the tank drained. The attachment and adjustment on your replacement must match its own instructions.
Close the supply and flush or lift the chain to drain the tank. Confirm it does not refill. Lift the ceramic lid with both hands and set it on a stable padded surface. If the shutoff will not stop refill, call a licensed plumber before removing the flapper.
Photograph the lever hole and old flapper setting. American Standard tells owners of its 7381193-200.0070A to note the number on the float ball. That number transfers to the same OEM design; it does not transfer automatically to a Korky band or dial.
Unclip the chain from the lever, then release the flapper from the pegs beside the overflow. The illustrated OEM Cadet uses a hairpin cotter and clevis pin at the lever. Keep small fasteners together. Do not pull on the overflow tube to free a stiff hinge.
Look for debris, mineral buildup and damage where the rubber seals. Korky says deposits can prevent closure and cracked or warped valves need replacement. Clean the seating surface gently before fitting the new flapper; this procedure uses no solvent, acid or abrasive repair.
Fit the replacement to its matching hinge attachments. Reconnect the chain at the lever hole most directly above it, following Korky’s guidance. For ordinary hinged flappers, Korky recommends 1–2 links of slack. Check that spare chain cannot fall across the valve seat.
Restore the supply, let the tank reach its marked waterline, and flush. Watch the flapper lift and settle without a chain snag. Use the replacement’s own adjustment directions if it closes too soon or stays open too long. Repeat the water-loss test before calling the seal fixed.
The tank stays on the bowl for this hinged-flapper procedure. If the leak diagnosis calls for removing the flush valve or loosening tank bolts, use a licensed plumber if you cannot safely support and reseal the ceramic tank.
The Korky 450BP package illustrates a black top nut and a removable green cover. Use this sequence only when the installed valve matches that instruction drawing.
Close the supply and drain the tank before touching the Champion seal carrier. Confirm the tank model and valve shape against the 450BP package. If the shutoff leaks or will not stop refill, stop and call a licensed plumber. A Champion family name is not enough.
On the matching black-nut version, Korky says to unscrew and remove the black nut, then lift off the green cover. If your assembly has different hardware or will not release by hand, stop. Do not apply pliers or use this sequence on a different guide-rod assembly.
Replace the old seal in the location shown in the package drawing. Korky then says to lift the post while replacing the green cover and twist the cover until nested. Check the supplied seal and any small sealing parts against the instructions for your package version.
For this illustrated version, Korky specifies tightening the black nut until two loud clicks. Refill the tank and test for water loss. If your top hardware differs, do not copy the click instruction merely because the tank says Champion. Use the instructions for that exact valve revision.
If your Champion hardware does not match the black-nut drawing, keep the old parts together and photograph the valve before asking American Standard to identify it. Do not force a part that appears to twist off in a video. The tank and valve revision determine the removal method.
These are Korky branded aftermarket parts. Choose the matching fit, not the largest flapper or the part whose color resembles the old one.
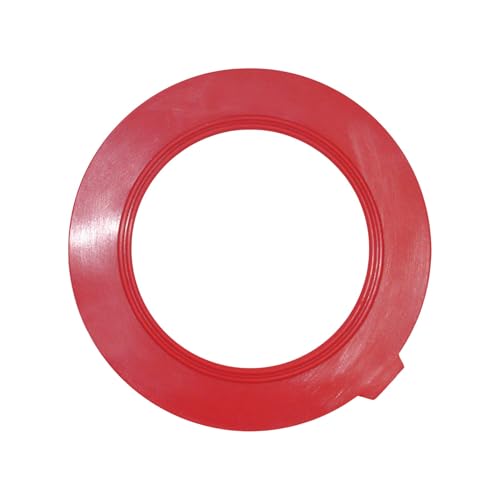

Product prices and availability are accurate as of the date/time indicated and are subject to change. Any price and availability information displayed on Amazon.com at the time of purchase will apply to the purchase of this product.
| Part | Key specs | Pick it if | Skip it if |
|---|---|---|---|
| Korky 3040BP Cadet 3 flapper | 3040 / 3040BP, 3-inch opening, Hinged flapper, Stainless chain, 5-year maker warranty | Your listed Cadet 3 model and installed 3-inch hinged valve both match. | You have a 2-inch hinge, Champion carrier or unfamiliar replacement valve. |
| Korky 450BP Champion 4 seal | 450 / 450BP, Champion 4 seal, 7301111-0070A cross-reference, Hardware-specific fit | The seal cross-reference, model and installed hardware match the Korky package. | Your valve needs a full assembly, has damage or differs from the package drawing. |
| Korky 100BP Ultra 2-inch flapper | 100 / 100BP, 2-inch opening, Band and dial, Stainless chain, 5-year maker warranty | Your tank appears on the 100BP fit list and has matching 2-inch hinged hardware. | The valve opening is 3 inches or the tank uses a Champion carrier or specialty seal. |
Each part seals a different valve design, so your tank and valve decide, not a score.
The 3040BP is Korky’s specific Cadet 3 replacement, rather than a seal chosen only because it looks large. Korky lists American Standard models 2403, 2568, 2907, 4000, 4007, 4019, 4021, 4027 and 4202. Read the marking inside your tank and compare the installed flush valve before using that list.
Its maker identifies a 3-inch opening and a hinged rubber flapper with a stainless-steel chain. The replacement target on Korky’s page is American Standard 738920-0070P. That is a useful part-number cross-check when your old package survives, but the model and valve shape still need to agree.
The reason to choose this part is its documented Cadet 3 fit. A Champion’s central-post seal carrier does not become a match because its seal is also round. An older Cadet with a 2-inch opening belongs in the other fit route, even if both toilets carry the same family name.
Korky describes the rubber as chlorine resistant and lists a five-year warranty. Those are maker statements, not a service-life measurement. Neither statement tells you whether a nicked seat or a chain stretched across the opening will let water escape. Inspect those before treating the new rubber as the whole repair.
Fit the flapper only after shutting off the water and draining the tank. Release the old side attachments carefully and check that the new hinge moves freely. Use the replacement package for its adjustment details. The settings for American Standard’s 7381193-200.0070A do not automatically apply to this Korky part.
My call: use the 3040BP when the listed Cadet 3 model and current hardware both match. If the tank number is missing or the valve has been changed, pause for identification rather than stretching a 3-inch flapper onto unfamiliar pegs. A positive fit check is more useful than the word universal.
The 450BP replaces a seal on a matching Champion 4 flush valve. It is a Korky part, not an American Standard OEM kit and not a complete flush valve. Korky identifies American Standard seal 7301111-0070A as its replacement target. That cross-reference is the starting point for the hardware check.
Korky’s 2017 package instructions list Champion 4 models including 2004, 2034, 4266, 4272, 4077 and 4281, then require a separate valve-shape check. They also show valves that do not fit. A familiar tank number therefore does not override a mismatch between your installed carrier and the package drawing.
For the illustrated version, a black nut comes off the top and a green cover lifts away from the seal. Korky instructs you to lift the post while refitting the cover, nest it, and tighten the black nut until two loud clicks. Use that sequence only for the pictured version.
A worn ring can be the right repair when the tank loses water down to its seal. It will not mend a cracked valve body or solve a leak below the sealing surface. The leak-level test matters here because changing a ring and removing a complete flush valve are different jobs.
Check the package contents as well as the ring. Korky’s current product page describes a seal and an O-ring, while the older instruction sheet illustrates its own hardware sequence. Do not assume every old valve, package generation or guide-rod assembly uses the same small parts. Keep the removed pieces until the leak test passes.
My call: use the 450BP for a confirmed seal-only repair on matching hardware. Stop if the old assembly will not come apart by hand, the carrier is cracked or the water falls below the sealing surface. Those symptoms need a separate diagnosis. More turning force is not a substitute for identifying the revision.
Korky’s 100BP Ultra is the 2-inch route for older hinged-flapper tanks. The maker lists Cadet models 4029, 4078, 4083, 4053 and 4650, along with Evolution 2 Flowise and Mainstream 4061 and Monarch 4003. These are different matches from the Cadet 3 list above.
The product includes a rubber flapper and stainless-steel chain. Korky calls it adjustable and lists a five-year warranty. The adjustment changes how long the flapper stays open; it cannot change a 2-inch hinge and sealing surface into a 3-inch part or a Champion central-post seal.
That distinction matters when the old tank only says Cadet. Read the number, inspect the side attachments and measure the flush-valve opening with the water shut off. Do not measure across the widest outside edge of the rubber. The rubber overlaps the seat, so that outside span is not the opening size.
Korky’s Ultra instructions use a band and numbered dial, with model-specific settings. If the flapper closes too quickly, Korky’s troubleshooting directs you toward a longer-open setting. If it stays open too long or double flushes, the dial can shorten the flush. Follow the 100BP package rather than an OEM Cadet notch number.
The chain needs attention before the dial does. Korky tells you to connect at the lever hole directly above the flapper with minimal slack. A taut chain can keep the seal from closing; extra links can fall across the seat. Watch a full lift and return before changing the flush duration.
My call: choose the 100BP for a listed 2-inch tank with matching current hardware. Tank 4112 is not on this product’s cited fit list, so this recommendation does not extend to it by family name. Ask for an exact identification if your tank or hinge is absent rather than guessing from age.
| Part | Use | Opening or hardware | Useful feature | Limit | Amazon |
|---|---|---|---|---|---|
| Korky 3040BP Cadet 3 toilet flapper | Listed Cadet 3 tanks | 3-inch hinged valve | Specific maker model list | Not all Cadet tanks | Check price on Amazon |
| Korky 450BP Champion 4 flush valve seal | Matching Champion 4 seal | Hardware-specific carrier | Seal-only repair | Not a full assembly | Check price on Amazon |
| Korky 100BP Ultra 2-inch toilet flapper | Listed 2-inch tanks | 2-inch hinged valve | Adjustable band and dial | Not a 3-inch part | Check price on Amazon |
Use the row as a cross-check, then compare the actual valve. The model lists below come from Korky; the Champion assembly identifiers come from American Standard.
| Tank or valve clue | Maker’s identification | Decision |
|---|---|---|
| Cadet 3: 2403, 2568, 2907, 4000, 4007, 4019, 4021, 4027, 4202 | Korky 3040 / 3040BP | Check 3-inch hinged hardware; then use Cadet route |
| Cadet: 4029, 4078, 4083, 4053, 4650 | Korky 100 / 100BP | Check 2-inch hinged hardware; then use older-tank route |
| Evolution 2 Flowise or Mainstream 4061; Monarch 4003 | Korky 100 / 100BP | Same 2-inch hardware check |
| Champion 4: 2004, 2034, 4266, 4272, 4077, 4281 | Korky 450BP instructions require valve-shape match | Tank match alone does not establish seal fit |
| Champion two-piece assembly identified for 1.28 gpf | American Standard 7382098-128.0070A | Identification only; not interchangeable with the 1.6 gpf identifier |
| Champion two-piece assembly identified for 1.6 gpf | American Standard 7382098-160.0070A | Identification only; confirm valve revision |
| 4112, missing number, different hinge or replaced valve | No positive match in the three cited product fit lists | Identify current valve before selecting a replacement |
For a 4112 tank, preserve the old chain and any float until the exact replacement is identified. Do not move into the 100BP route simply because both are described as 2-inch repairs. The old float position is useful evidence when identifying the original repair part.
A number on one flapper does not describe the same flush duration on another. Keep OEM float-ball notches separate from Korky band and dial adjustments.
| Part in your hand | Maker’s adjustment information | Do not assume |
|---|---|---|
| American Standard 7381193-200.0070A | Frosted bulb: notches 1–10; notch 3 for 1.28 gpf; notch 10 for 1.6 gpf | These numbers are not Korky settings |
| Korky 100BP Ultra | Use its band/dial and model-specific package chart | A visible number alone establishes the full band setting |
| Korky 3040BP Cadet 3 | Follow its own package setup and fit checks | Copying an OEM float-ball number sets this part correctly |
| Korky 450BP seal | Seal and carrier assembly procedure for matching hardware | A seal changes the carrier’s flush-volume setting |
If an ordinary flapper closes too early, first watch the chain lift it straight up. Too much slack can waste lever movement before the flapper lifts. On the 100BP, use Korky’s adjustment directions only after that mechanical check. Holding the handle down is a symptom to investigate, not a final adjustment.
If it stays open too long, inspect the chain for a snag and make sure the rubber can settle on the seat. Korky’s 100BP troubleshooting then uses the dial to shorten the flush. Change one setting at a time so you can see which change affected the result.
| What happens | Check before changing another part | Next step |
|---|---|---|
| Flapper never settles flat | Taut chain, spare links across seat, hinge alignment | Correct chain path and watch a full flush |
| Tank loses water to the seal level | Correct part, seat debris, seal position | Repeat fit and seating checks with water off |
| Tank loses water below the seal | Valve body, overflow tube or lower seal | Use a flush-valve diagnosis; ring alone may not fix it |
| Full tank keeps spilling into overflow | Float setting, debris or fill-valve shutoff | Follow fill-valve guidance |
| Water appears outside the tank | Ceramic, bolts, supply connection | Shut off water if safe and call a licensed plumber |
Repeat the pencil-mark test after the new seal has been installed and the chain adjusted. Quiet at the end of a refill does not prove the tank holds water. The useful check is whether the level stays put with the supply closed and the tank undisturbed.
If the level falls below the seal, stop swapping flappers. The flush-valve replacement guide covers that different repair. Do not loosen the large valve retaining nut or tank bolts while the tank is full.
A damaged seat also changes the repair. Korky says cracks or warping call for valve replacement; new rubber cannot repair that surface. If cleaning visible debris and correcting the chain do not stop the leak, inspect the valve rather than adding weight to the flapper or tightening unrelated hardware.
A hinged-flapper swap can stay inside the drained tank. Keep the tank on the bowl and follow the replacement package.
Stop and identify the revision. Do not force a green cover, center post or unfamiliar locking part.
Do not disconnect the live supply or continue tank disassembly. Call a licensed plumber and isolate the water only if you can do so safely.
Do not keep using cracked ceramic or open a pressure-assist vessel using flapper instructions. Have a licensed plumber assess the repair.
No. Cadet 3 uses a hinged flapper, older 2-inch valves use smaller hinged flappers, and Champion uses a seal carrier. Match the tank model and installed valve, because the family name alone does not establish fit.
Korky lists its 3040BP for models 2403, 2568, 2907, 4000, 4007, 4019, 4021, 4027 and 4202. Confirm the current 3-inch hinged hardware as well. This is a Korky branded aftermarket part.
A Cadet-style hinged flapper is not the same part as a Champion seal carrier. Korky’s 450BP requires a matching tank and valve shape. Inspect the installed carrier before choosing a seal.
The valve revision may differ from the example you are following, or the hardware may be stuck. Stop rather than forcing it with pliers. Identify the tank and valve, then use the matching maker instructions or a licensed plumber.
Tank 4112 is not on the 100BP fit list cited here. That absence does not prove incompatibility, but it is not enough evidence for a positive recommendation. Identify the installed valve and exact replacement before proceeding.
For American Standard 7381193-200.0070A, the maker identifies notch 3 for 1.28 gpf and notch 10 for 1.6 gpf. Those settings apply to that OEM float-ball design. Follow the replacement package if you install a Korky flapper.
Korky recommends 1–2 links of slack for ordinary flappers and a lever hole directly above the flapper. Check that the chain allows full closure and cannot fall across the seat. Do not apply that number automatically to a Champion assembly.
Check the fit, chain path and sealing surface first. Korky’s water-level test separates a seal leak from a leak below the seal. Continuous flow into the overflow after refill can point to the fill valve rather than the new flapper.
No. The Korky 450BP is a replacement seal for matching hardware, not a complete carrier or flush valve. The seal sits on the carrier; damage to the carrier or valve body needs a separate diagnosis.
Isaac Daniels is a licensed journeyman plumber in Georgia. I checked the Korky fit lists and installation sheets alongside American Standard’s part identifiers. The advice separates tank names from current valve hardware and keeps uncertain matches out of the buying recommendations.
I select by documented fit, then check for a genuine branded new offer on Amazon. I re-read the three offers on Oct 22, 2026, 6:43 AM EDT: all new and in stock from Amazon.com. Each part seals a different valve design, so fit decides and none is scored.
I use maker specifications and instructions for the repair advice. Product inclusion does not establish measured service life. Korky’s durability names are product labels, not a reason to assume a specific number of years in your tank.
| Check | Rule used |
|---|---|
| Model and hardware | Both must match; no family-name-only recommendation |
| Offer | Genuine Korky, new, in stock from Amazon.com, as read on Amazon on Oct 22, 2026, 6:43 AM EDT |
| Installation | Maker sequence for that valve; stop when the hardware differs |
| Scores | None; the tank model and valve design decide the part |