
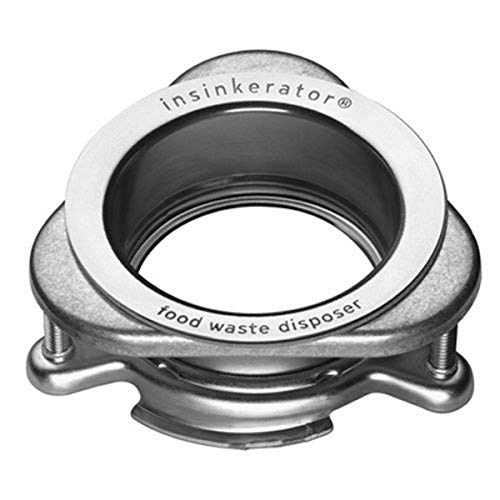
InSinkErator FLG-SSB
$24.43 at Amazon
Check it on AmazonPrice as of Nov 22, 2026, 9:30 AM EST

Match the mount and sink thickness before you take it apart.

As an Amazon Associate I earn from qualifying purchases.
Choose FLG-SSB for a standard InSinkErator mount. Thick sinks need an extended-flange check; Waste King EZ Mount needs its own assembly.
Choose the repair, then the part. FLG-SSB replaces the visible flange; FLG-SSLG adds reach for thicker sink material; QLM-00 replaces the Quick Lock mount. None is a universal Waste King EZ Mount replacement.

Product prices and availability are accurate as of the date/time indicated and are subject to change. Any price and availability information displayed on Amazon.com at the time of purchase will apply to the purchase of this product.
| Part | Key specs | Pick it if | Skip it if |
|---|---|---|---|
| InSinkErator FLG-SSB | FLG-SSB, 74290D, Brushed stainless | Your InSinkErator model takes the standard flange and the existing mounting hardware is sound. | You need a complete mount, an extended flange or a Waste King EZ Mount assembly. |
| InSinkErator FLG-SSLG | FLG-SSLG, 10082, 3/4 to 1-3/4 in. maker range | Your InSinkErator instructions call for an extended flange and confirm the sink thickness. | You have an EZ Mount system or unresolved model, thickness or seal requirements. |
| InSinkErator QLM-00 | QLM-00, 72376D, Quick Lock mount | Your InSinkErator repair needs a matching mount assembly as well as the flange. | Your existing hardware is sound and only the flange needs replacement, or the mount is EZ Mount. |
Waste King calls its systems EZ Mount and Pro 3-Bolt. Moen GX75c has its own illustrated parts list. A familiar metal rim above the sink does not identify the hardware below it.
The flange passes through the sink material at the drain opening. Countertop thickness beside the bowl is a different measurement. Keep the actual sink thickness with your disposal model number.
InSinkErator 81168 Rev B says to shut off electrical power at the circuit breaker or fuse box. Support the disposal before releasing it. Use an electrician for hardwire disconnection or uncertain grounding.
Each part does a different job and fits only the model and sink its instructions name, so they’re matched by number, with no score.
FLG-SSB is the flange to consider when your InSinkErator mount is sound and the flange itself needs replacement. InSinkErator lists it as part 74290D, the brushed finish in its standard sink-flange line, next to the polished FLG-SS (70129D). Start with the disposal model and its installation sheet, because the visible finish cannot tell you whether the flange has enough reach through your sink.
The distinction from QLM-00 matters. A flange-only purchase is for the part that passes through the drain opening. The mounting assembly beneath it includes separate hardware. If your backup flange, mounting ring or retaining snap ring is missing or damaged, identify those parts before you order only a new FLG-SSB.
Choose FLG-SSB for a documented standard-flange repair with reusable mounting hardware. Do not replace a sound mount just to change the visible rim. Equally, do not keep damaged hardware because the new stainless rim looks right. The disposal hangs from the assembly beneath that rim.
Check the seal instructions for the actual disposal. The Badger 81168 Rev B procedure uses a rope of plumber’s putty under the flange. The EZ Connect manual also contains a supplied rubber sink-gasket branch. A rubber gasket in one model’s box does not change the instructions for a different model.
Thick sinks need a separate decision. InSinkErator’s extended-flange product page begins at 3/4 inch, while the EZ Connect instruction says to use FLG-SSLG above that thickness. At exactly 3/4 inch, ask InSinkErator which arrangement your model requires rather than assume the standard flange will work.
Before installation, inspect the drain seat after removing the old seal. If the sink is damaged or the flange will not seat correctly, stop and have a plumber assess it. Extra sealant and harder screw tightening are not substitutes for a sound seating surface and correctly assembled retaining hardware.
The baffle is a separate accessory in InSinkErator’s flange information. Keep a splash-guard replacement separate from this FLG-SSB repair, even when both parts are visible through the same drain opening. Check the package contents before ordering so a flange-only purchase does not leave you waiting for a separate accessory.
FLG-SSLG is the extended InSinkErator flange, identified as part 10082. Its job is to reach through thicker sink material. InSinkErator’s product page specifies a sink range of 3/4 to 1-3/4 inches. This is a sink-material thickness range, not the diameter of the drain hole or discharge pipe.
Check FLG-SSLG before dismantling a thick composite or solid-surface sink installation. Record the disposal model, the existing mounting system and the thickness where the flange actually passes through the bowl. Buying a long flange because the countertop is thick can send you toward the wrong repair.
The exact lower boundary needs care. The product page starts at 3/4 inch; the EZ Connect manual says an extension is needed above 3/4 inch. Those statements do not settle every installation at exactly that thickness. Get a model-specific answer from InSinkErator before relying on the remaining thread or groove engagement.
An extended flange also does not establish compatibility with another brand. Waste King’s Pro 3-Bolt extension has its own identifier and a different published range. Waste King EZ Mount is a separate system again. Match the mounting hardware beneath the sink, even if two stainless rims look similar from above.
Keep the seal choice tied to the installation sheet. Extra flange length does not authorize silicone where a manual requires another seal, or putty over a supplied rubber sink gasket. Read the sink manufacturer’s material-care instructions as well. If the two instructions conflict, pause for the makers’ guidance.
The EZ Connect manual also changes mounting-screw length for certain sink thicknesses. That is a separate check from choosing the extended flange. Do not assume the longest screws in an old mounting assembly are appropriate just because you are installing a longer flange. Use the hardware combination shown for your disposal.
Treat the FLG-SSLG listing’s “Deep Sink 3.5” wording as a product title, not a usable thickness allowance. The maker’s 3/4 to 1-3/4-inch range and your model instructions govern the selection. Check those limits against the drain seat before ordering; the title alone does not establish a fit.
QLM-00 is the Quick Lock sink mount, identified by InSinkErator as part 72376D. It is the route to consider when the repair extends beyond the visible flange. The maker’s Quick Lock page describes a twist-on, twist-off mounting design and a polished stainless sink flange.
Compare a full mount with a flange-only replacement when the mounting ring or supporting hardware is missing, damaged or impossible to identify. A new rim alone cannot replace the hardware that holds the disposal. Have a plumber inspect corrosion or damage before deciding which existing pieces can stay.
The Amazon listing title spells the model QLM-OO, with letters, while the maker’s parts reference uses QLM-00, with zeros. Check the model marking on the package. Use part 72376D and the actual manufacturer identification to confirm the item before purchase; spelling similarity alone is not a fit check.
This mount is not a way to make an EZ Mount Waste King accept any flange. Waste King’s L-2600 parts sheet calls its complete EZ Mount assembly 1030. Its 9950 sheet calls the three-bolt assembly 3157AMC. Follow the disposal’s own parts list rather than join mount components by appearance.
A complete mount also does not waive a thick-sink check. The extended InSinkErator flange is a separately identified part. Before ordering QLM-00 for a thick bowl, ask which flange and hardware combination your disposal needs. Do not assume the word “mount” means every sink-thickness option comes in the package.
Replacing the assembly requires removing the disposal from its support. InSinkErator’s Badger manual says to isolate power at the breaker or fuse box and support the unit before releasing it. If it is hardwired, have an electrician handle disconnection. Keep your head and body out from beneath an unsupported disposal.
Before ordering QLM-00, compare the package’s model marking and part number with the disposal’s parts list. Check which components are included and which existing pieces the instructions retain. If you cannot identify the assembly beneath the sink, photograph it and ask InSinkErator to confirm the mount before removing the disposal.
Choose by what must be replaced, rather than rank a standard flange against an extended flange. The right answer changes with the mount and the sink.
| Part | Repair route | Check first | Limit | Buy |
|---|---|---|---|---|
| FLG-SSB | Flange only | Standard InSinkErator fit | Does not replace a damaged mount | Check it on Amazon |
| FLG-SSLG | Longer flange | Maker range 3/4 to 1-3/4 in. | Confirm exact 3/4-in. boundary | Check it on Amazon |
| QLM-00 | Mount assembly | Quick Lock model and hardware | Thick sinks still need checking | Check it on Amazon |
Use the disposal model label and its parts drawing together. “Three-bolt” describes a mounting arrangement; it does not prove that every flange, gasket and ring from another brand can be mixed into it.
| Mount example | Flange only | Full mount | Thickness evidence | Seal and action |
|---|---|---|---|---|
| InSinkErator standard | FLG-SSB / 74290D | QLM-00 / 72376D | EZ Connect extension rule: above 3/4 in. | Follow model’s rubber-gasket or putty branch |
| InSinkErator thick sink | FLG-SSLG / 10082 | Confirm assembly contents | Product page: 3/4 to 1-3/4 in. | At exactly 3/4 in., ask maker |
| Moen GX75c | 1017 | 1824 | INS10477C: up to 1/2 in. | Fiber gasket below sink; sealant above |
| Waste King L-2600 EZ Mount | Separate SKU not established | 1030 | FAQ standard limit: 1/2 in. | Use EZ Mount instructions; not Pro extension |
| Waste King 9950 Pro 3-Bolt | Check model parts list | 3157AMC | FAQ standard limit: 1/2 in. | Match the model’s flange gasket |
| Waste King extended Pro 3-Bolt | 3140AMC | Confirm retained hardware | FAQ 1-1/4 in.; 9950 sheet 1-3/8 in. | Ask maker to resolve upper limit |
Photograph the disposal’s model label and the mount before you order. For an L-2600, the parts drawing leads to assembly 1030; for a 9950, it leads to 3157AMC. Those are different complete-mount identifiers within the same Waste King brand.
Moen’s GX75c drawing separates flange 1017 from mount kit 1824. That distinction is useful even without a purchase link: it tells you which repair you are asking the maker to identify. A flange-only part and a mounting kit should not be treated as the same contents.
A generic listing that names several disposal brands is not enough evidence for a mixed assembly. Ask the disposal maker to confirm the exact part number with your model and sink thickness. Keep that answer with the instructions, especially if you intend to retain another brand’s mounting hardware.
The important dimension runs through the sink where the flange passes through. It is easy to confuse that with the countertop beside the bowl or the width of the visible stainless rim.
Before loosening the mount, look at the sink’s underside around the drain. A thick sink bowl can need a longer flange even when the countertop measurement seems irrelevant. If installed hardware hides the actual drain-seat thickness, use the sink model’s technical drawing or have a plumber verify it.
Do not treat the listing’s “3.5” wording for FLG-SSLG as the sink thickness it accepts. InSinkErator publishes 3/4 to 1-3/4 inches for sink material. The flange’s name, the drain opening and the material thickness describe different things. Record the dimension you actually need.
Thickness can also change the mounting screws. The EZ Connect manual calls for 1-1/8-inch screws instead of 1-1/2-inch screws above 3/8-inch sink thickness. Check the step for your disposal before reusing screws from an older assembly. A long flange and long mounting screws are separate decisions.
| You are checking | Use it for | Do not substitute |
|---|---|---|
| Sink material at drain seat | Flange reach and mounting instructions | Countertop thickness outside bowl |
| Disposal model and mount | Part-number match | Visible finish or brand name alone |
| Mounting screws | Manual’s thickness-specific hardware | Longest screws from the old box |
| Discharge connection | Drain reconnection instructions | Flange dimensions |
Read the disposal installation sheet and the sink-care instructions together. The seal directly beneath the flange lip is a different part from a fiber gasket below the sink.
| Documented case | Upper sink seal | What stays separate |
|---|---|---|
| Badger 81168 Rev B, step 10 | 1/2-in. rope of plumber’s putty around underside of sink flange before seating | Underside fiber gasket and mounting parts |
| EZ Connect, step 8a | Supplied rubber sink-gasket branch | Do not borrow step 8b by habit |
| EZ Connect, step 8b | 1/2-in. rope of putty, no supplied rubber gasket | Do not invent a combined seal stack |
| Moen INS10477C | Sealant compatible with sink care instructions | Fiber gasket below sink, then mount hardware |
| Composite or stone sink with disputed directions | Confirm with sink and disposal makers | No universal silicone substitution |
The fiber gasket is not an instruction to omit the upper seal. Moen shows the fiber gasket below the sink, followed by the backup flange, upper mounting ring and retaining snap ring. The sealant belongs at the sink flange above. Keeping those positions straight matters more than adding another bead outside the joint.
Moen warns against moving or rotating the flange once seated, because that can break the seal. Hold the flange in position while the underside assembly is secured. Tighten the three mounting screws evenly as its instructions show, and do not overtighten.
For a stone or composite sink, check the material-care directions before opening a putty or sealant container. Moen specifically points readers to the sink’s requirements, including non-staining sealant where specified. If the sink calls for a product your disposal instructions do not address, ask both makers before proceeding.
If the sink requires a chemical sealant, use its label’s ventilation and protective-equipment directions. Moen lists safety glasses among its installation tools. Do not add solvents to free a stuck flange without the sink maker’s approval. A seized flange or damaged seating surface is a reason to call a plumber.
Use model-specific maker instructions for fit. Where two maker documents disagree, keep the disputed boundary open instead of choosing the larger number.
| Part or fit | Listing or other source | Maker evidence | Use for this decision |
|---|---|---|---|
| QLM name | Amazon listing says QLM-OO | Parts reference says QLM-00 / 72376D | Confirm manufacturer marking and package |
| FLG-SSLG wording | Listing says “Deep Sink 3.5” | Maker range is 3/4 to 1-3/4 in. | Use maker thickness, not ambiguous title |
| InSinkErator lower boundary | Product page begins at 3/4 in. | EZ Connect says extension above 3/4 in. | Ask maker at exactly 3/4 in. |
| Moen 1017 | Earlier catalog excerpt: up to 3/4 in. | INS10477C mount: up to 1/2 in. | Use manual’s 1/2-in. limit; confirm above it |
| Waste King 3140AMC | FAQ extension limit 1-1/4 in. | 9950 sheet extension limit 1-3/8 in. | Do not claim fit above 1-1/4 in. without confirmation |
A part that almost reaches is a fit question for the manufacturer, not a reason to remove the fiber gasket or leave off the retaining snap ring. Those pieces appear in the mounting drawings for a reason. Keep the assembly complete and get a confirmed flange and hardware combination.
The 3/4-inch Moen catalog reference does not override the INS10477C installation manual’s 1/2-inch limit for its illustrated mount. Follow the installation manual for this procedure. Ask Moen to confirm your exact assembly before using it on a thicker sink.
The steps below summarize InSinkErator’s Badger 81168 Rev B procedure. Use your exact model manual for the final sequence. A Waste King EZ Mount parts drawing is not a substitute for its installation instructions.
Turn off electrical power at the circuit breaker or fuse box, as InSinkErator directs. For a cord-connected unit, unplug it too. Keep the disposal supported before releasing its mount. If hardwire disconnection is needed, stop for a qualified electrician.
With power isolated, disconnect the drain trap from the discharge tube and disconnect the dishwasher connection if present, following the Badger manual. Have a container ready for retained drain water. Photograph the original route before moving the connections.
Keep the unit supported. The Badger procedure uses the supplied wrenchette in the mounting lug to release it; the manual warns it can fall free. Keep your head and body out from underneath. If you cannot control its weight, have a plumber remove it.
After the disposal is safely removed, loosen the three mounting screws and remove the snap ring as the manual shows. Keep track of the mounting ring, backup flange and fiber gasket. Do not reuse a damaged or distorted retaining part.
Remove the old flange and old putty, as the Badger procedure directs. Protect the sink surface and inspect the drain seat. If the flange is seized, avoid forcing tools against the sink bowl; have a plumber assess the flange and sink before continuing.
Changing a stopper or a removable splash guard is a different job from removing the sink flange. Those accessories may be accessible from above. The flange holds the mounting assembly through the sink, so the disposal must be removed from that assembly before the flange itself can come out.
If your model’s instructions allow the old mount to remain during a whole-disposal replacement, that does not mean the old flange is removable while the disposal still hangs from it. Decide whether you are retaining a sound mount or rebuilding the flange joint before you start disconnecting anything.
Stay with the same maker procedure from removal through testing. The Badger putty steps below do not replace the EZ Connect rubber-gasket branch or a Waste King installation sheet.
Check the exact flange and mount identifiers against the disposal’s parts list. Confirm the sink thickness and mounting-screw choice. At an unresolved thickness boundary, contact the maker before assembling the joint.
Apply a 1/2-inch-thick rope of plumber’s putty around the underside of the sink flange before seating it, per Badger 81168 Rev B, p.6. Follow the EZ Connect rubber sink-gasket branch if your model specifies it. For any chemical sealant, follow its label’s ventilation and PPE requirements.
Follow the model drawing for the fiber gasket, backup flange and mounting ring, then seat the snap ring fully in its groove. Moen INS10477C also shows that underside order for its three-bolt mount. Do not move the fiber gasket above the sink to improvise a seal.
Tighten the three mounting screws evenly and firmly per the applicable instructions. Moen expressly says not to overtighten or rotate the seated flange. Do not invent a torque setting or use stronger tightening to compensate for the wrong flange length.
Keep power isolated while lifting and locking the disposal according to its manual. Reconnect the discharge and any dishwasher connection without forcing alignment. Have a plumber handle uncertain drain connections; use an electrician for hardwire reconnection or grounding questions.
The upper seal, retaining snap ring and disposal lock must each be correct. A dry cabinet after a brief rinse does not prove that a misassembled mount is safe. Have a plumber check a flange that shifts, a ring that will not seat or a disposal that cannot lock fully.
InSinkErator’s Badger leak test uses a filled, stopped sink followed by a drain-down check underneath. Keep the disposal switched off for the flange leak check and keep the electrical supply isolated while you inspect or adjust connections.
With connections restored and the disposal off, insert the stopper and fill the sink as the Badger test directs. Look beneath the drain-seat joint. Do not reach toward electrical parts if water appears in the cabinet.
Drain the sink and look under it for leaking water, as the manual directs. Watch the flange area as well as the discharge connection. A leak that appears elsewhere needs its own diagnosis rather than another flange purchase.
Keep power off before working beneath the sink again. Recheck the correct seal branch and the hardware order. If the leak persists, or if water is near wiring, stop and call the appropriate plumber or electrician.
| What you find | Next action |
|---|---|
| Water first appears at sink/flange joint | Recheck upper seal, seating and even clamping with power off |
| Water appears at discharge elbow | Use the model’s drain-connection instructions; do not assume flange failure |
| Water near plug, hardwire box or switch | Keep power off; have an electrician assess it |
| Repeated leakage or a damaged sink seat | Have a plumber inspect before another reseal |
A new flange cannot correct an electrical fault, a damaged sink or a recalled disposal. Check the equipment label before committing to a repair.
Moen INS10477C directs readers unfamiliar with electrical work to a qualified electrician. Keep power isolated. Do not use flange replacement as an occasion to improvise wiring or grounding.
Have a plumber inspect a flange that will not release, a cracked seat or a mount that will not clamp evenly. Repeated tightening can leave the actual fit problem unresolved.
CPSC’s 2017 Anaheim and Moen notice covers specified disposals with an impact hazard. Match the model and serial information to the notice. Affected owners should stop use and follow the replacement remedy.
CPSC’s 2018 InSinkErator SinkTop switch notice concerns a fire hazard. Check the existing switch against the notice. Affected owners should stop using the switch and obtain the replacement; changing the flange does not fix it.
| Question | If yes | If no or unknown |
|---|---|---|
| Can you identify model and mounting family? | Read its exact parts diagram | Photograph the label; ask maker |
| Is only the standard InSinkErator flange damaged? | Check FLG-SSB | Check full mount or another family |
| Does the sink need more flange reach? | Check model-specific extended flange | Use standard only after thickness check |
| Is mounting hardware damaged or missing? | Check QLM-00 for a matching InSinkErator | Retain only sound, identified parts |
| Is it Waste King EZ Mount? | Ask for exact assembly 1030 match | Do not buy EZ Mount by brand alone |
| Are thickness and sealing directions resolved? | Plan removal, support and leak test | Pause for maker guidance |
For a documented standard InSinkErator repair, FLG-SSB is the starting point. For a thick sink, check FLG-SSLG against the exact manual. For damaged supporting hardware, check the complete mount. These are three different jobs; a finish change alone does not decide between them.
For Moen or Waste King, use the matrix to identify the part to ask the maker about. Do not replace a documented 1030 EZ Mount requirement with a generic three-bolt kit just because an online search returns it. A correct identifier is more useful than an unverified purchase shortcut.
No universal match is established by a drain rim’s appearance. InSinkErator specifies its flange for its manufactured disposals, and Waste King identifies separate EZ Mount and Pro 3-Bolt assemblies. Use the disposal model’s parts list to confirm the flange and the hardware retained below it.
No. Waste King’s L-2600 drawing identifies complete EZ Mount assembly 1030; its 9950 drawing identifies three-bolt assembly 3157AMC. Moen’s GX75c drawing lists mount kit 1824. A three-bolt description alone does not prove that individual parts can be mixed.
Remove the disposal from the mounting assembly first. InSinkErator’s Badger sequence isolates power, supports and releases the disposal, then removes the upper mounting hardware and flange. A stopper or removable splash guard is a different part and may have a different removal procedure.
Follow the replacement disposal’s instructions and inspect the retained assembly. Keeping a documented compatible mount is a different job from replacing the flange itself. Have a plumber assess damaged, corroded or unidentified mounting hardware rather than assume it can carry the new disposal.
InSinkErator’s FLG-SSLG, part 10082, has a published sink-material range of 3/4 to 1-3/4 inches. Its EZ Connect manual says an extension is required above 3/4 inch. Ask the maker to resolve an installation at exactly 3/4 inch and confirm the model’s mounting hardware.
Waste King’s FAQ gives a standard maximum of 1/2 inch and a Pro 3-Bolt extension range up to 1-1/4 inches. The 9950 parts sheet gives 3140AMC an upper limit of 1-3/8 inches. Ask Waste King to resolve that difference for your model; do not apply the Pro extension to EZ Mount.
Use your model’s branch. Badger 81168 Rev B puts a 1/2-inch rope of putty around the underside of the sink flange before seating it. EZ Connect has separate rubber sink-gasket and putty branches. The underside fiber gasket is a different component; it does not by itself replace the upper sink seal.
Only use a sealant arrangement confirmed by the sink and disposal instructions. Moen INS10477C directs readers to sink-care requirements, including non-staining sealant where specified. There is no single silicone substitution established for every flange here. Follow the selected sealant’s ventilation, PPE and curing directions.
Use the selected sealant’s directions and the disposal’s installation procedure. No universal waiting time is established for every putty, rubber gasket or chemical sealant. Do not take a silicone cure time and apply it to the Badger putty procedure or an EZ Connect rubber-gasket installation.
Check the upper flange seal and assembly order with power isolated. Moen’s fiber gasket sits below the sink; the upper seal is a separate joint. Water below that joint needs diagnosis. If the seating surface is damaged or a correct reseal still leaks, have a plumber inspect it.
First isolate power and remove the supported disposal and mounting hardware using the model instructions. The Badger manual then removes the flange and old putty. If the flange remains seized, stop for a plumber instead of prying against the sink or using an unapproved solvent.
Do not assume it does. InSinkErator’s decorative flange information treats the baffle as a separate accessory. Check your disposal model and the exact package. The removable stopper is also a separate part.
Isaac Daniels is a licensed journeyman plumber in Georgia, license #JP507711. We read the maker’s part identifiers and installation instructions for this repair, then separate model-specific requirements from recommendations about when to stop and call a pro.
We match the disposal family, flange identifier and sink-thickness evidence before considering an offer. All three are genuine InSinkErator parts. Links go to listings sold by Amazon.com. We left unmatched parts out of the purchase picks.
These parts get no score: a flange, a deeper flange and a mount do different jobs. A longer flange does not outperform a standard flange on a sink that needs the standard part. We use maker documents for fit, keep disputed boundaries visible and do not infer a compatibility guarantee from a product photograph.
| Check | Selection rule |
|---|---|
| Mount | Exact model or documented assembly match |
| Sink thickness | Model-specific instructions; disputed boundaries stay unresolved |
| Seal | Upper seal and underside gasket identified separately |
| Offer | Genuine model; New; not scarce or unavailable |
| Scoring | No score: each part does a different job, so model and sink fit decide |