
On this page
Find exactly where it’s leaking
Wipe everything dry with a paper towel, turn the water on, and watch. Under a sink the water almost always starts at one of four spots, and each one has a different fix.[1][2]
- Top of the line, at the faucet
Same fix as spot 2. If the drip is higher than that, at the faucet body or the drain, see kitchen sink leaking underneath.[1][2][11]
Find the repair for my leak
I use these three checks in order: locate the first wet spot, identify the pipe, then inspect the exposed surface. The result sends me to the relevant repair below.
This guide cannot replace an in-person pipe inspection or a pressure test. I stop and call a licensed plumber if I cannot isolate the water or identify a sound connection surface.
Fix 1: snug the nut the right amount
I start by checking whether the nut is loose, while keeping the valve and the pipe behind the wall still. A drip can also come from a damaged sleeve, a misaligned valve or a scored pipe, so I do not keep tightening a joint that will not seal.[1][2]
BrassCraft’s install sheet for its compression fittings says overtightening “can lead to failure and leaking long after installation.” That’s why the steps above stop early. On chrome, wrap the wrench jaws or use a smooth-jaw wrench; channel locks can scratch chrome.[1][2]
Fix 2: redo the joint with a new sleeve
The brass sleeve (also called a ferrule or olive) seals by getting squeezed between the nut and the valve. Once it’s been tightened, it’s shaped to that one joint. A leaking sleeve gets replaced, not reused.[1][2]
Use a 5/8‑inch OD sleeve for the common ½-inch copper stub. If you’re keeping the old valve, match the sleeve and nut to the valve’s brand. My ferrule sizing guide and stuck ferrule guide cover both jobs.[1][2][3]
Parts that fix it
Each part fixes a different leak spot, so they aren’t scored against each other. Find your spot first, then pick the part.[3][4][7][9]
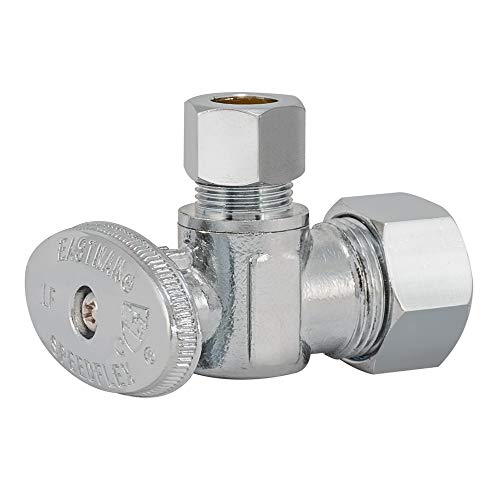
Product photo from the Amazon listing.
Eastman 10738LF quarter-turn angle stop
The tradeoff: I still need a smooth copper stub and the correct sleeve.

Product photo from the Amazon listing.
SharkBite Max UR23036BN angle stop
The tradeoff: I must remove the old sleeve and leave enough clean insertion length.

Product photo from the Amazon listing.
Eastman 48074 16-inch braided connector
The tradeoff: this exact line fits 3/8-inch compression at both ends.[9][11]

Product photo from the Amazon listing.
Debialo JMTT-001 sleeve puller
The tradeoff: I need access to the old nut, and the pipe still needs inspection afterward.
New offer sold by a third-party seller on Amazon when checked; check the seller before ordering.
Product prices and availability are accurate as of the date/time indicated and are subject to change. Any price and availability information displayed on Amazon.com at the time of purchase will apply to the purchase of this product.
| Part | Key specs | Pick it if | Skip it if |
|---|---|---|---|
| Eastman 10738LF quarter-turn angle stop | 5/8 in. OD comp inlet, 3/8 in. OD comp outlet, quarter turn, 125 psi, 40–140°F, lead-free, chrome[3][4][7][9] | Your old stop leaks at the handle, won’t shut off, or you’re redoing joint 1 anyway. It drops onto the common ½-inch copper stub.[3][4][7][9][11] | Your stub is PEX, CPVC or too scratched to seal a sleeve. Look at the SharkBite Max or my stops by pipe type.[3][4][7][9] |
| SharkBite Max ½ in. push x 3/8 in. comp stop | ½ in. push inlet, 3/8 in. comp outlet, copper, PEX, CPVC, PE-RT, 125 psi, 160°F, lead-free DZR brass[3][4][7][9] | You’ve had trouble getting a compression joint to seal, or the stub is PEX or CPVC. It even goes on a wet line, per SharkBite.[3][4][7][9] | Less than an inch of clean pipe sticks out. SharkBite says it needs at least one inch, so that’s a cut-back repair, often behind the wall.[3][4][7][9] |
| Eastman 16 in. braided connector, 3/8 x 3/8 comp (comparison only) | 16 in. long; 3/8 in. compression at both ends; lead-free, with NSF 61 compliance claimed by Eastman.[3][4][7][9] | Spot 2 or spot 4 still leaks after the connector maker’s permitted adjustment, or the old line is damaged.[3][4][7][9][11] | The drip is at joint 1 or the handle. A new line won’t touch those.[3][4][7][9][11] |
| Debialo sleeve puller, ½ in. compression | ½ in. compression only, uses the old nut’s threads, machined body and screw[3][4][7][9] | Cutting behind the old sleeve would leave too little clean pipe for the replacement valve’s specified engagement.[3][4][7][9] | You have plenty of stub. A tubing cutter behind the old sleeve is faster and gives you a fresh, square end.[3][4][7][9] |
Eastman 10738LF for a new stop on copper
The leak spot decides the part. Read the fit lines before you order.[3][8]
If I am opening joint 1 and the existing stop is stiff, damaged or will not shut off, I replace the valve while the water is isolated. A sleeve alone cannot repair a worn valve mechanism. Old multi-turn stops are often stiff or won’t close fully when you finally need them.[3][8][11]
The 10738LF is the plain, correct part for the standard sink stub: 5/8‑inch OD compression in, 3/8‑inch OD compression out. It’s a quarter-turn ball valve with Teflon seats, which closes with a flip instead of a dozen turns of a stiff handle.[3][8]
Eastman’s spec sheet lists what’s inside: a brass body, bonnet, stem and ball, a Teflon sealing ring, rubber O-rings and a zinc alloy handle. The compression nut and sleeve are brass. The handle is removable and held on by a steel screw.[3][8]
Where it does well
Eastman rates the 3/8‑inch outlet at 4.0 gallons a minute at 20 psi. The ¼-inch outlet version is rated 2.2 gallons a minute, about half, so match the outlet to the job before you buy.[3][8]
Pick the outlet by what it feeds. The same valve comes as the 10737LF with a ¼-inch outlet for an ice maker line, this 10738LF with 3/8 inch for faucets and toilets, and the 10739LF with ½ inch.[3][8]
The 10756LF is the straight version, for a stub that comes up through the floor. Two more versions are the 10720LF, sold without the nut and sleeve, and the 10722LF with a loose key in place of a handle.[3][8]
Eastman lists ASME A112.18.1/CSA B125.1 and NSF 61 and 372 for this valve family. RWC, the company behind the Eastman brand, warrants Eastman stop valves for five years when they’re installed per its instructions.[3][8]
The 125 psi and 140°F maximum rating covers a sink or toilet supply. It’s also the top pick in my under-sink shut-off valve guide.[3][8]
SharkBite Max when a sleeve won’t seal
A compression joint can fail at a damaged sleeve, a loose nut or a scratched or misaligned pipe. I check the pipe condition before choosing the replacement connection. A push-to-connect stop skips the sleeve.[4][5][6][8]
The SharkBite Max pushes on and locks, with nothing to tighten. It takes copper, PEX, CPVC, PE-RT and HDPE, and the listing rates it 125 psi and 160°F. Its outlet is a normal 3/8‑inch compression thread, so your supply line goes on as usual.[4][5][6][8]
Inside, SharkBite’s spec sheet lists a lead-free DZR brass body, an EPDM O-ring and a stainless steel grab ring and retainer. SharkBite lists the angle stop at about 2.6 by 1.7 by 1.1 inches, so measure the space behind the vanity before you buy.[4][5][6][8]
Where it does well
The pipe end decides whether it holds. SharkBite’s guide says the pipe must be round and free of scratches, cuts or gouges, cut square and deburred. That matters here, since the pipe end just had an old sleeve on it. Look it over, and if it’s marked up, cut back to clean pipe first.[4][5][6][8]
Mark 1 inch on a ½-inch copper stub, then push the valve on with a slight twist until it hits the tube stop. SharkBite says the mark should sit within 0.005 inch of the release collar. The valve can go on a wet line, be pressure tested right away and still turn after it’s on.[4][5][6][8]
RWC warrants SharkBite Max supply stops for five years, and its pipe list names hard-drawn Type K, L or M copper, PEX and CPVC. HDPE needs a tube stiffener from the pipe maker. To take it off later, use SharkBite’s disconnect clip or tongs.[4][5][6][8]
Two catches. SharkBite says to leave at least one inch of pipe for the stop to go on, and the old brass sleeve still has to come off first. Mark the insertion depth with SharkBite’s gauge and push to the mark. For the full tradeoff, see compression vs push-to-connect valves.[4][5][6][8]
Braided lines for spots 2 and 4
A braided line doesn’t use a loose brass sleeve. Each nut end carries its own seal, and once that seal is worn, more turns won’t help. I replace a connector with a damaged end seal rather than trying to force that seal closed.[7][8][9]
Check the faucet end before you buy. Most newer faucets end in 3/8‑inch compression, which the Eastman 3/8 x 3/8 line fits. Older faucets with ½-inch threaded shanks need a ½-inch FIP end, like the PROCURU pair.[7][8][9]
The Eastman 48074 has a PVC core, braided nylon reinforcement, a clear vinyl shell and a grade 304 stainless braid outside. The ends are brass barbs with nickel-plated solid brass nuts. Eastman’s listing gives 15 to 158°F and a 2,500 psi burst rating, with UPC, CSA and NSF 61 approval.[7][8][9]
Where it does well
Length matters more than people expect. Eastman makes the 3/8 by 3/8 line from 12 to 120 inches; the 48074 here is 16 inches long. Measure from the stop outlet to the faucet tail and buy the next length up rather than stretching a short one. For a faucet with ½-inch threaded shanks, I choose a connector whose faucet end is ½-inch FIP. A 3/8-inch compression nut is a different connection, even if the hoses look similar.[7][8][9]
The PROCURU listing describes stainless steel braid and nickel-plated brass nuts. I treat any certification wording there as the seller’s claim, rather than independent certification proof. It comes as a 2-pack, one for hot and one for cold. Check the faucet end on the listing before you order; this pair is ½ inch FIP.[7][8][9]
RWC warrants Eastman braided supply lines for five years when they’re installed per its instructions. A line that has dripped at the nut once is cheap enough to replace instead of fighting.[7][8][9]
I use the connector maker’s instructions for both ends. SharkBite’s quarter-turn instruction describes its own walkthrough, not a universal setting for the Eastman or PROCURU connectors. For more choices see my braided faucet supply line picks.[7][8][9]
Debialo puller for a short stub
The old sleeve usually stays stuck to the pipe when the valve comes off. With a long stub you just cut behind it. With a short one, cutting can leave too little pipe, and then the fix moves inside the wall.[9]
A sleeve puller threads onto the old nut and screws the nut and sleeve straight off the pipe. The listing says this Debialo is for ½-inch copper compression fittings only, the kind it names on dishwasher, sink and toilet stops. It won’t fit other sizes.[9]
The listing lays out the steps. Take the old valve body off first, so only the nut and sleeve are left on the pipe. Thread that nut into the puller’s threaded mouth, tighten the screw, line the tool up with the pipe and turn the handle. The listing says about 10 turns pulls the nut and sleeve together.[9]
Where it does well
It’s built for the hard cases too. The body and screw are machined, and the listing says it works on stops that are badly corroded or frozen. It works only on ½ inch compression, which is the common sink stub.[9]
The listing also says it pulls the crimped copper back to round. Don’t take that on faith. Look at the pipe end after the sleeve comes off: if it’s oval, scored or has a ridge where the old sleeve bit, the new sleeve or push valve may not seal. Then cut back if there’s room.[9]
After it’s off, wipe the pipe clean and check it before the new sleeve goes on. A new sleeve, nut and valve go on a pipe end that’s round and smooth. If there’s enough straight pipe behind the old sleeve, cutting it off with a tubing cutter is the other way, and the listing pitches this tool for when there isn’t.[9]
Which part fixes which leak
| Part | Fixes | Size to check |
|---|---|---|
| Eastman 10738LF stop | Spot 1 that won’t seal; spot 3[3][4][7][9][11] | 5/8 in. OD comp stub[3][4][7][9] |
| SharkBite Max stop | Spot 1 on copper, PEX or CPVC; spot 3[3][4][7][9][11] | ½ in. pipe, clean end[3][4][7][9] |
| Eastman braided line | Spots 2 and 4[3][4][7][9] | Faucet end 3/8 comp[3][4][7][9] |
| PROCURU braided line | Spots 2 and 4[3][4][7][9] | Faucet end ½ in. FIP[3][4][7][9] |
| Debialo sleeve puller | Gets a stuck sleeve off for fix 2[3][4][7][9][11] | ½ in. compression only[3][4][7][9] |
Should you put tape or pipe dope on it?
Plenty of videos say to wrap the sleeve in PTFE tape. Here’s what actually seals a compression joint, and what the maker sheet allows.[2]
| What you put on | Does it help? | Why |
|---|---|---|
| PTFE tape on the sleeve or threads | Not a fix[2] | The seal is the sleeve squeezed against the valve seat, not the threads. Tape can’t fill a crushed or scratched sleeve.[2] |
| A drop of oil or thread sealant on the nut threads | OK[2] | BrassCraft says it eases nut assembly. It helps the nut turn smoothly; it isn’t the seal.[2] |
| Putty or gasket-type material | No[2] | BrassCraft says not to use it; it can cause a leak.[2] |
| A new sleeve on a clean, square pipe end | The real fix[2] | That’s the surface that seals, so that’s what has to be right.[2] |
When to call a licensed plumber
- The main won’t shut off
Don’t open a joint you can’t isolate. See how to shut off your water main, and call if it won’t close.[1][2][5]
Questions people ask
How do you stop a compression fitting from leaking?
What is the most common cause of a leaking compression fitting?
Will a weeping compression joint seal itself?
How tight should a compression fitting be?
Can you reuse a compression sleeve?
Should you use Teflon tape on a compression fitting?
What size compression sleeve do I need under a sink?
What if my compression fitting won’t seal no matter what?
How I chose these parts
I compared 5 models: four repair picks and the PROCURU connector alternative. I checked the Eastman SpeedFlex and SharkBite Max spec sheets, the makers’ installation instructions and the current Amazon listings.[9][11]
Why I choose by leak location
I compared four repair picks and one connector alternative using the Eastman SpeedFlex spec sheet, SharkBite Max spec sheet, maker installation instructions and the exact Amazon listings.
I follow the installation instructions for the exact valve and connector. The steps keep the valve steady, protect the pipe and separate a sleeve leak from a worn valve or connector seal.[9][10]
I keep the four parts separate because they solve different problems. The Eastman stop fits a sound copper stub. The SharkBite Max changes the inlet connection. The Eastman line replaces a connector, and the Debialo tool removes a stuck sleeve.[9][10]
How I pick parts
- I match the inlet and outlet sizes before choosing a valve.[9][10]
- I checked the exact models and New offers on November 18, 2026.[9][10]
- I use maker documents for ratings and installation details, and identify listing-only claims as such.[9][10]
- I checked CPSC recall records for Eastman, SharkBite, PROCURU and Debialo on November 15, 2026. No matching recalls appeared in that search.[9][10]
- I show the time beside each Amazon price so I can tell when it was checked.[9][10]
Sources
I checked these documents and listings on November 15, 2026, and re-checked the listings on November 18, 2026. Each numbered citation points to the source for the statement beside it.
- SharkBite compression supply stop installation. Isolation, pipe preparation, assembly order, and the maker-specific ¾-turn and ¼-turn instructions.
- BrassCraft compression fittings instructions 225.01. Square, undamaged tube; nut then sleeve; two wrenches; permitted assembly lubrication; warning against overtightening.
- Eastman SpeedFlex quarter-turn stop specification. 10738LF and related model sizes, materials, 125 psi, 140°F maximum, flow ratings and maker-listed standards.
- SharkBite Max stop valves specification. UR23036BN size and dimensions, materials, pipe compatibility, insertion depth, 125 psi and 160°F maximum.
- SharkBite Max installation guide. Round, smooth pipe, insertion mark, disconnect tools and the release-collar check.
- SharkBite Max supply stop walkthrough. At least one inch of pipe for insertion, preparation and leak checking.
- Eastman compression braided faucet connector. 48074 is 16 inches with 3/8-inch compression connections at both ends; construction and available lengths.
- RWC limited warranty. Current warranty table and conditions. Eastman stop valves and stainless braided supply lines, and SharkBite Max supply stops: five-year limited coverage, subject to the stated installation conditions.
- Product listings on Amazon. Exact Eastman 10738LF, SharkBite UR23036BN, Eastman 48074, Debialo JMTT-001 and PROCURU 9SF16-2P listings checked November 15, 2026, and re-checked against the November 18, 2026 price feed. Listing statements are attributed to their brand or seller. Eastman 10738LF listing
- CPSC recall records. Brand search checked November 15, 2026. No matching recalls found; this does not establish certification.
- Leak-location map on this page. The numbered repair locations and finder routing are my diagnostic organization of the maker-described connection types. The pipe dimensions come from the Eastman specification and SharkBite insertion chart.